
HELPFUL INFORMATION
FREQUENTLY ASKED QUESTIONS
—
Paver Patios
-
You can use your paver patio after 24 hours.
-
Avoid deicing chemicals. Calcium-based products or rock salt (sodium chloride) are safe for use on pavers. Avoid magnesium-based products, which can damage the surface
-
You can shovel, but use a plastic shovel. If you’re plowing, use plastic blade protectors because metal blades will damage your paver surface.
-
Sealing is a personal preference and is generally used to enhance or deepen the color of the pavers and protect the surface from stains. In most cases, we seal your paver patio for you. If you chose to seal the pavers yourself after installation, wait several months to ensure the pavers are completely clean and free of any efflorescence, which could get trapped under the sealant. Efflorescence is a whitish haze caused by naturally occurring salts used in the manufacturing process, and it goes away with time.
-
While some people may find it a nuisance, others consider moss attractive because of the Old English look and feel that it provides. Moss generally develops in shaded areas that slowly dry up after rain. Pressure washing after applying a solution of 20% dish soap and 80% water to the surface will get rid of moss. Do not use the pressure washer on high power or too close to the surface to avoid damaging the surface or dislodging polymeric sand. Always keep the nozzle at a 30-degree angle, 12 inches away from the surface, and use the fanned nozzle setting.
-
Do not use the pressure washer on high power when rinsing, or you risk damaging the surface or dislodging polymeric sand. Always keep the nozzle at a 30-degree angle, 12 inches from the surface, and use the fanned nozzle setting. If some jointing sand is washed out, you may need to sweep in some new sand.
—
Plantings
Lawns
-
Water the seeded areas immediately and keep the soil dark with moisture until the grass is visible. Depending on sun exposure, this may require watering in the early morning once every other day or watering both in the early morning and again in the evening every day. Germination times vary with seed variety. In Wisconsin, soil temperatures fluctuate greatly. Patience is necessary if you don't see your grass seed coming up as quickly as expected. Kentucky Bluegrass can take over 30 days to germinate. When the grass is about 2" in height, begin watering more deeply (longer, but less frequent) every three days or more often as needed during hot weather to encourage deep root growth. Your new lawn should be cut with a sharp mower when it reaches 2-3" of leaf height.
-
Water-sodded areas with one inch of water right away to help lay the sod down and give the good soil contact to root into. Water every day in each area for at least 15 minutes. It may be necessary to water during the heat of the day to reduce the mat temperature and keep the sod from drying out (this is typically required only in late July or early August and is completed with a light watering between 2:00-3:00 PM). To determine when you can mow the sod, pull up on the sod; if the mat does not pull up, you are ready to mow.
Trees and Shrubs
-
Newly planted trees and shrubs must be watered regularly for 2-3 years. In general, most trees will need to be watered weekly the first year, every two weeks the second year, and every three weeks the third year. As with at the time of planting, place a hose at the base of the plant and turn the water on at a trickle for approximately 1-2 hours. (It is essential to water slowly enough to allow the water to penetrate the soil without running off.) Depending on the time of year, it may be necessary to water daily for the first 3-4 weeks after planting.
-
Trees and shrubs can be fertilized with granular fertilizers such as 10-10-10 at a rate of one cup per two caliper-inches of the trunk (diameter of trunk one foot above the ground). The fertilizer should have at least 50% slow-release nitrogen and be spread around the tree at the drip line or the outer edge of the root ball, in early April-June. A liquid fertilizer can be used for evergreens.
-
Wood and other organic mulches help trees retain moisture, prevent weed germination, and release nutrients as they decompose. Once the mulch is depleted, typically every 1-3 years, it must be replenished.
-
The best prevention is to keep your trees healthy with proper watering and fertilizing. Monitor your trees for insect and disease pressures. A few insects or a little powdery mildew will not decimate your tree. However, high numbers of certain pests can severely stress and harm your tree.
-
Your tree is a cultivated tree and should already have the desired shape at installation. However, look for crossing branches that rub on each other. It is also a good idea to thin out the tree every 3-5 years to invigorate new growth and fullness. Be sure not to cut out the “leader” of the tree. Prune shade trees in late March or early April new growth or lack of it can be spotted. Prune evergreens in late June through July. Remembering the three “D’s”—dead, dying, or diseased; these are the branches to look for and prune out anytime.
Perennials
-
Check your garden weekly. If we are not receiving 1 inch of rain naturally each week, you will need to water your perennials using soaker hoses or sprinklers, allowing the water to run for 1½-2 hours twice each week. Depending on the time of year, it may be necessary to water daily for the first 3-4 weeks after planting.
-
Deadheading is the practice of removing spent or finished flower heads. This should be done after the flower head has gone past its prime and is no longer beautiful. Depending on the variety of flowers, you may remove the entire stalk or just the individual head. Removing the spent flowers prevents the plant from going into a reproductive cycle so that the plant puts its energy into producing more flowers.
-
Fertilizing will improve plant vigor, giving you more, longer-lasting flowers. Use a slow-release fertilizer in early spring. This method releases nutrients with each watering. Some that you could use are, Osmocote or a general-use fertilizer such as 10-10-10 or 13-13-13. The slow-release fertilizers will save you time because they are usually only applied twice a year as opposed to an instant fertilizer which only lasts about 7-10 days. Instructions must be followed to avoid over-fertilizing and damage. Perennials installed in planting beds with river rock or natural stone pebbles do not have the benefits or the nutrients provided by the breakdown of shredded mulch, so be sure to fertilize them throughout the season. Contact our maintenance department to set up a fertilizing and weed control service for your perennial planting beds.
—
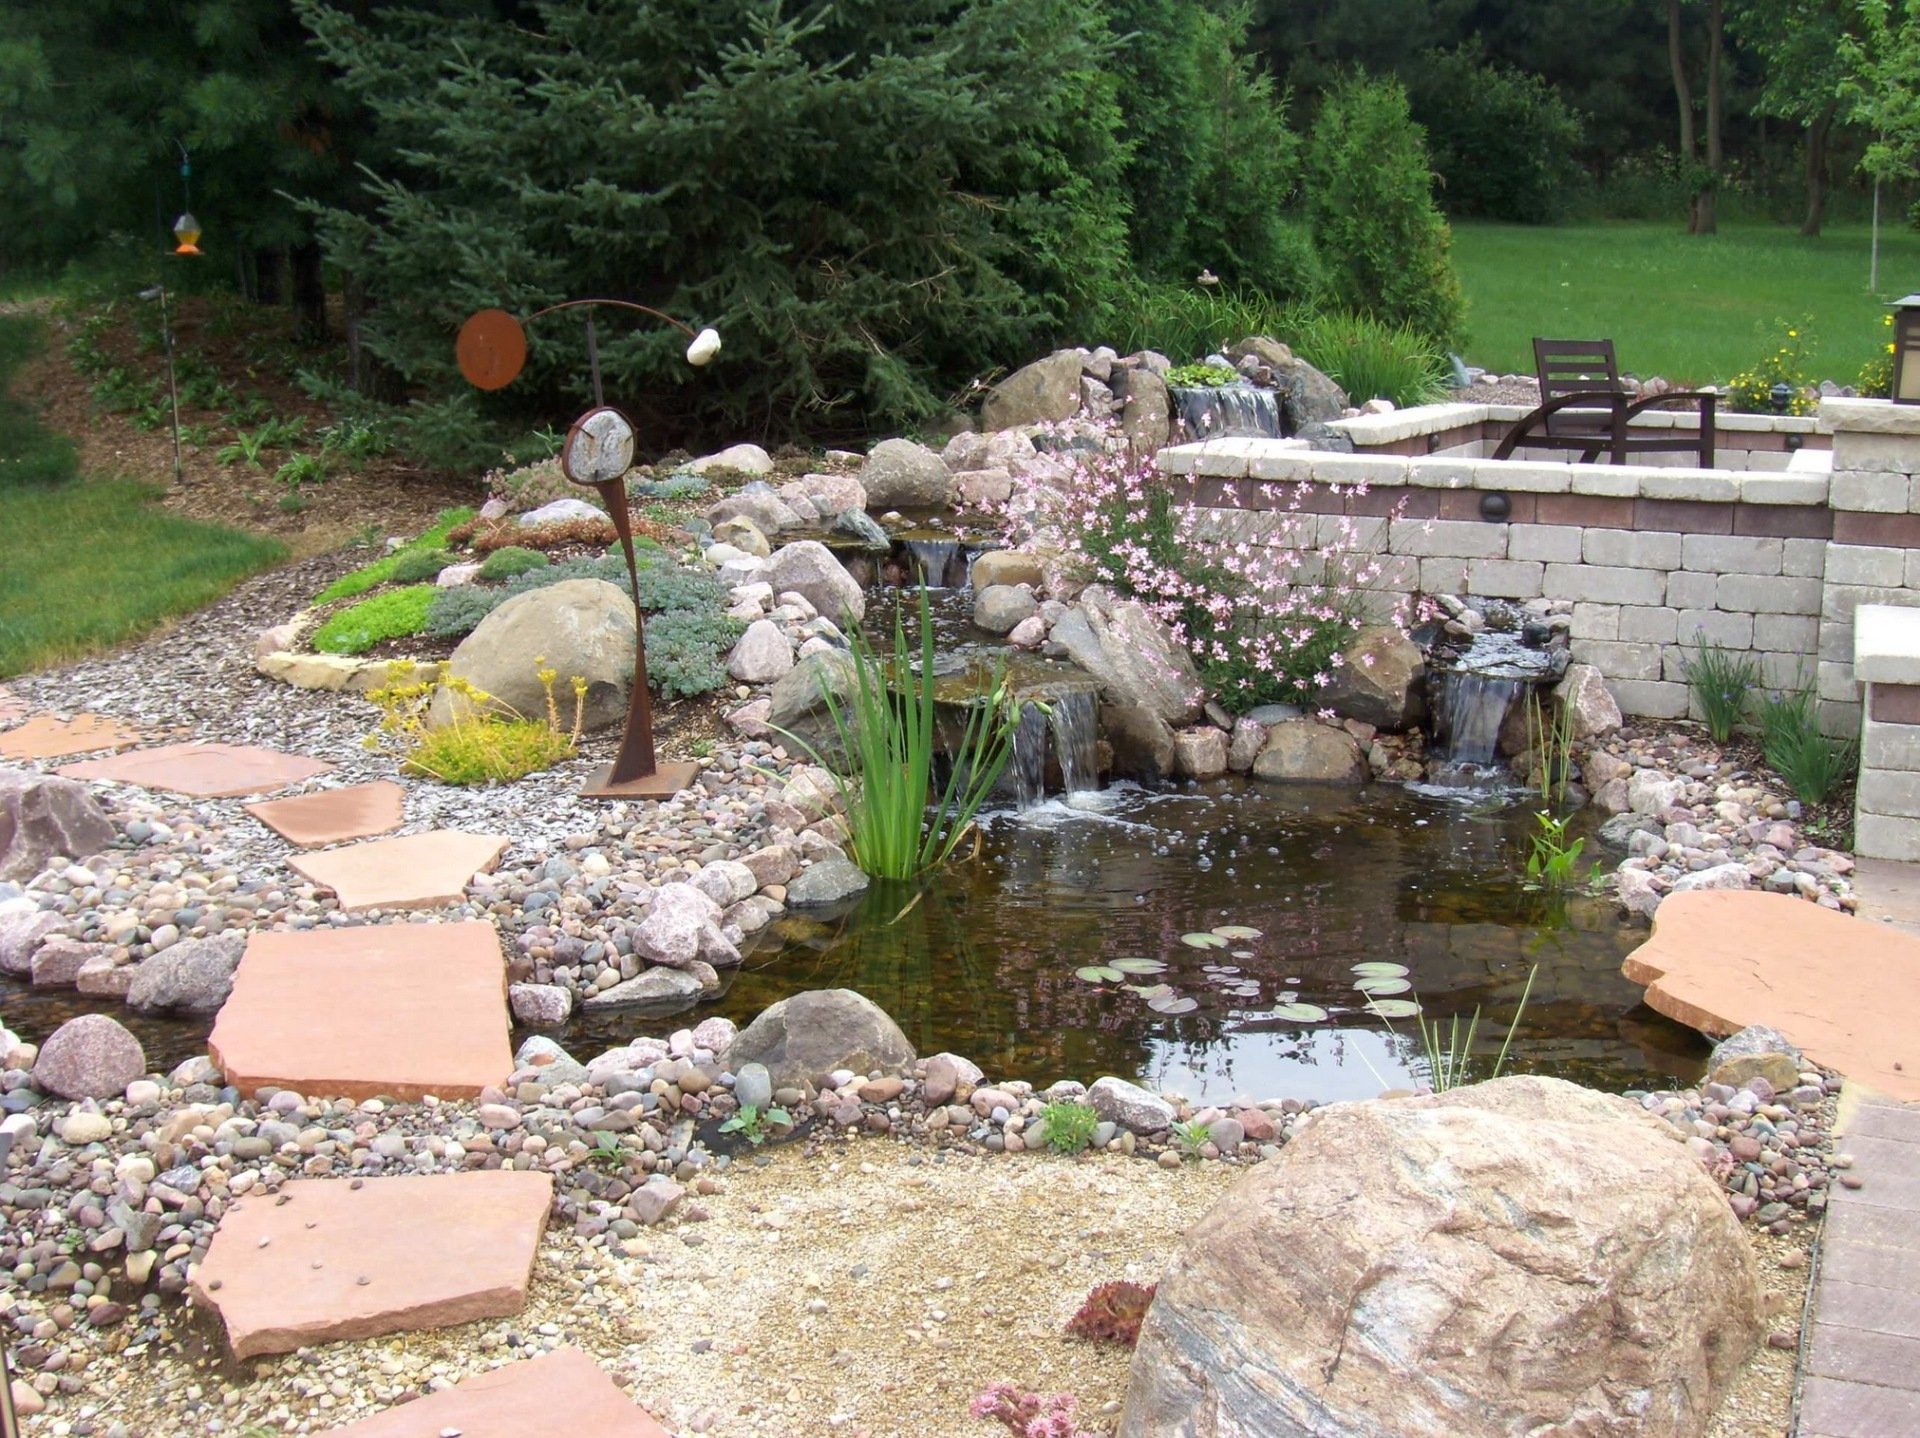
Ponds
-
How much water is lost to evaporation depends on factors such as the pump flow, the number and height of waterfalls, and sunlight exposure. The first step is to know the volume of the pond per inch. Use the formula Length x Width x .75 x .0833 x 7.48. Next, find out how much you should be losing, which is .5-1% of your pump's flow rate. So for a 15' x 20' pond, we have about 140 gallons per inch. For a newer pond (minimal lily pad and plant shade) in full sun with a 5,000gph pump, we have 50 gallons of loss per day. So 140 gallons per inch / 50 = 2.8. You would average 1" of water loss every 2.8 days.
-
99% of leaks are not due to a hole in the liner but rather water running over the edge of the liner.
-
Do not try to investigate a leak if the ground is wet from rainfall or recently after an irrigation system has run.
STEP 1: The most common leak is water running over the liner. Look around the stream and waterfall for areas that have settled. Look for wet mulch or wet gravel along the edge. Sometimes it is necessary to inspect the areas under the mulch, as water can run down a fold in the liner and never leave a trace on the surface. If you have recently had plantings installed or have been walking around the edge of the liner, you may have accidentally stepped down part of the liner, causing water to leak out in the low spot. To fix a low liner edge, build the liner back up by backfilling and compacting the soil beneath the liner. This will raise the edge of the liner above the water level. Cover the liner with pond gravel, and you are done.
STEP 2: Look for obstructions in the stream and waterfalls. If you have recently adjusted some of the rocks to change the sound or look of a waterfall, you may have inadvertently caused some of the water to be diverted over the liner. Also, look for excessive planting or algae growth in the stream that causes dams that allow water to flow over the edge. If you use any floating plants in your Biofalls, inspect the area occasionally as the volume of plantings raises the water level and can cause water to leak over the back or side edge of the Biofalls.
STEP 3: Can’t find the leak yet? Shut down the main pump and leave it off for 12 or more hours. Make sure to perform this test during the nighttime hours or on a very cloudy day, so evaporation does not fool you in your leak test. Make a small mark on the skimmer or rock somewhere at the water line. After a minimum of 12 hours, check to see if the water level has dropped below your mark. If you have fish in your pond and will have the pump off for more than 12 hours, we recommend you use a small aerator pump to provide oxygen to the fish. If the water level has dropped, you know the leak is in the pond. If the water level remains the same, the leak is elsewhere in your system. Leave the pump off and wait until the water level stops dropping. This could take several days. The water level will continue to drop until the leak is at the water line. When the water level stops dropping, you have determined the height of the leak. Simply investigate the water line all the way around the pond. It takes a sharp eye, and you may need to move many rocks to spot the leak. Don’t forget to check the area around the skimmer face plate! Use the wet soil method behind the liner and around the skimmer.
Still can’t figure out the leak? Contact Proscapes and schedule a service call. Try to give us as much information as possible so we can quickly assess the problem and fix it for you.
-
First, investigate if the leak occurs when the pump is off. You should never fill the basin past half full with the pumps on or the system will overflow upon shutdown. With the pumps on, half full is considered full. Never overfill the basin or leave the hose unattended. Leaving a hose on and overfilling the feature may float your basin blocks and liner.
Turn off the pump and fill the pondless basin up to the top and mark the level.
Let the basin sit for 24 hours & check the water level.
If the level has dropped the leak is in the basin. If it has not, investigate as above under “How do I find out where the leak is?”
Refill the basin a few inches and verify it drops to the same level. This level is where the leak will be found.
-
Follow the instructions below, or we can do it for you!
~ Bacteria and enzymes should be added periodically per directions. The debris net should be emptied weekly or bi-weekly, depending on the surrounding environment.
~ Clean the skimmer filter mats when the flow is noticeably reduced. Replace your filter mats every other season.
~ Remove the pump and clean the intake screen and or impeller if it becomes clogged.
~ Perform a spring cleanout every year. Pump out the water and gently wash all sludge/debris to the pond floor to be pumped out. Refill the pond and add de-chlorinator before reintroducing fish.
~ Regularly replace 10% of the pond water.
~ Ensure 50-60% plant coverage, including shoreline plants that will filter runoff.
~ Test your water frequently.
~ Test your soil before fertilizing to prevent over-fertilizing and runoff into the pond; minimize using fertilizers on the banked slopes of ponds.
~ Pick up pet waste.
~ Don’t feed wild turtles, other aquatic wildlife, or waterfowl (let them find their own food).
-
In Wisconsin, fish will do fine if your pond is at least 24 inches deep and your surface is not entirely frozen. Whether the Biofalls needs to be shut down depends on how cold the winter gets.
~ Remove pump and store
~ Place deicing pump, heater, and/or aeration in pond
~ Remove, clean, and store:
• Biofalls mats and media
• skimmer mats
• skimmer debris basket
~ Install floating heater and\or an Aquaforce solids handling pump
~ Cut back marginals
~ Clean pond floor if muck build-up is excessive
-
A severe algal bloom can kill fish because the death and decay of the algae severely reduces oxygen levels. Cyanobacteria (blue-green algae), in particular, is a bright green film-producing alga that is toxic to fish and wildlife. An overabundance of algae could be due to:
~ Overstocking/overfeeding fish. We recommend stocking no more than 1” fish per 20 gallons of water to prevent ammonia buildup.
~ Under-circulation and under-filtering from a pump and filter that is too small. Use the proper-sized pumps and filters and over-circulate to turn over the water volume every 1.5 hours.
~ An immature pond (give it a couple of months to establish its ecosystem). If your pond is new, creating a balanced ecosystem won’t happen overnight (bacteria take 2-6 weeks to colonize and begin to do their job). Like a fine wine, ponds mature with age, so don't be surprised or concerned if a new pond begins to grow some algae. Once the plants, fish, and bacteria are established, the algae will decrease.
~ Runoff and/or heavy rain: closed systems do not handle unintended input.
~ Runoff that contains excessive lawn fertilizers or animal wastes (encourages cyanobacteria growth)
~ Algae blooms occur in yearly cycles that may be dependent on weather. In colder climates, both plants and bacteria go dormant in cold water, creating less competition for nutrients and advantageous conditions for algae growth. The pond may turn green or become full of string algae in winter. Once the temperatures warm up, the plants and bacteria will begin to establish themselves once again, and the pond ecosystem will balance itself.
-
Algae needs very little sunlight to grow. Providing shade will help stabilize the pond temperature but has little to no effect on algae. Algae do love warm water, though, so adding shade will lower and stabilize your pond temperature.
-
Decomposing bacteria and introduced bacteria (the bottled bacteria) are all heterotrophic bacteria. These bacteria consume organic, nitrogenous material like plants, debris, and dead fish as their source of food and carbon source—a process called aerobic bacterial decomposition, or what we call decay or rot. These bacteria can be either anaerobic or aerobic and are capable of producing spores. Green water is caused by an excessively large number of tiny organisms called phytoplankton. Bacteria can limit algae growth to keep your pond water clear.
-
Flocculants are often misused. They help clear water from organic debris, including dead algae. It has very little effect on living cells. As some research implies, the consumption of dead algae cells may contribute to the killing of living cells by the release of an antibiotic, so removing dead cells may actually inhibit natural control. There is a fine balance, however, as the dead cells also become a food source for a recurrent bloom.
-
If you have fish, no. These copper-based compounds use up a lot of oxygen while killing algae blooms, which can also suffocate your fish. The best way to remove algae is to scoop it out regularly!
-
A number of Aquascape products help balance your pond ecosystem:
Aquacleaner Extreme Dry: Contains heterotrophic bacteria, activated barley, and enzymes that aid in organic decomposition; use after your spring clean-out
Bioballs: Replace clogged lava rock with Bioballs, which add more surface area for bacterial colonization and won’t clog like lava rock.
EcoBlast: Controls string algae
EcoBarley: Prevents algae bloom through the decomposition of barley which releases peroxides that break down the cell walls of algae; takes 4-6 weeks to work (don’t use for bloom control, but prevention)
SAB Extreme: Prevents string algae by “locking up” calcium, which string algae need to develop its stringy profile
-
Yes. Aquatic plants are essential for a well-balanced, healthy aquatic ecosystem. They provide:
~ Oxygenation of the water through photosynthesis
~ Balance of excess nutrients
~ Shade and water temperature control
~ Shoreline stabilization and erosion control
~ Reduction of pollutants (natural filtering)
~ Food and habitat for aquatic animals and wildlife
~ Food and habitat for beneficial bacteria
~ Beautification of the pond
-
Too much of a good thing is not good. Aim for 50-60% total plant coverage in the water to protect the ecological balance of the pond. For best results, strive for a mix of plants:
~ Submerged plants (typically mosses that can easily be pulled out if they over-reproduce)
~ Floating plants like lily pads (no more than 20% of the water’s surface)
~ Shoreline plants that are rooted in shallow water and at the water’s edge (turf grass is not a shoreline plant!)
An excess of vegetation can cause problems, including:
~ Impeded water circulation
~ Blocked filtration and pump systems
~ Excess vegetative decay, which lowers water oxygen levels
~ Increased sedimentation
~ All floating plants create a barrier on the water surface; an excess will prevent oxygen exchange with the atmosphere and photosynthesis in the water, reducing oxygen in the water and increasing the potential for a fish kill.
-
Some algae growth during the warmer months is a natural part of the aquatic ecosystem. However, if algae cover more than 20% of the surface, water is more likely to become stagnant and could kill your fish.
-
Yes. While there is no quick fix, close monitoring of your system and on-the-go adjustments using proven products can maintain the health of your pond ecosystem and keep your water sparkling clean.